Return to the Arch Index.
Requirements#
Download the latest Arch Linux ISO from the official site. Create a bootable USB using one of:
DD Command#
dd bs=4M if=path/to/arch.iso of=/dev/usb conv=fsync oflag=direct status=progress
Secure Boot. This is temporarly, as after you install arch you can follow the sbctl key signing and re-enable secure boot. So for now, disable it. Every motherboard bios is different, so look up your motherboard and how to disable it.Booting into ISO#
Network + UEFI check#
After booting the ISO, verify we have internet:
ping archlinux.org
Verify we are in UEFI mode:
efivar -l
If efivar -l outputs entries, the system is in UEFI mode.
Creating partitions#
Identify the target disk:
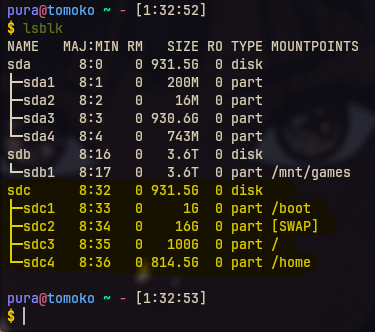
lsblk
You should see something like /dev/sdx or /dev/nvme1nx.
Wipe GPT:
gdisk /dev/sdx
In gdisk, type x for expert, then z to zap (delete), then y and another y to delete everything.
Then create partitions:
cgdisk /dev/sdx
Example layout for a 1TB SSD (On the first block, always keep empty and hit enter):
1024MiB  EF00  boot
16GiB    8200  swap
100GiB   8300  root
*GiB     8300  home  # rest of disk
We can now write the changes. Just write yes to confirm and then quit. Writing lsblk we can see the new drive is ready to be formatted and used.
Formatting partitions#
Use lsblk as reference for /dev/sdx or /dev/nvme1nx.
Format first partition into FAT32. This will be our boot partition:
mkfs.fat -F 32 /dev/sdx1
Now we are gonna create a swap partition. This will be our second partition:
mkswap /dev/sdx2
Turn on the swap:
swapon /dev/sdx2
For the third partition, which is our root, we wipe it using ext4:
mkfs.ext4 /dev/sdx3
Same for fourth, which is our home partition:
mkfs.ext4 /dev/sdx4
Run lsblk again to confirm you see 4 partitions:
Mounting filesystems#
Mount root, then create and mount boot and home.
To mount root, we do the following:
mount /dev/sdx3 /mnt
Now we can create our boot folder in /mnt:
mkdir /mnt/boot
Followed by home folder in /mnt:
mkdir /mnt/home
All that is left now is to mount boot:
mount /dev/sdx1 /mnt/boot
Lastly, mount home:
mount /dev/sdx4 /mnt/home
Check with lsblk that root, boot, home and swap are correct.
(/boot and /home might show /mnt/boot and /mnt/home)
Installing Arch Linux#
Updating mirror list#
Backup mirrors:
--country NL to just get fastest overall).cp /etc/pacman.d/mirrorlist /etc/pacman.d/mirrorlist.backup
Refreshing mirrors (in this example for NL):
reflector --verbose -n 20 -p https --sort rate --country NL --latest 200 --save /etc/pacman.d/mirrorlist
pacman -Sy archlinux-keyring before pacstrap.intel-ucode instead of amd-ucode on Intel CPUs.Install base system:
pacstrap -K /mnt base linux linux-firmware linux-headers base-devel amd-ucode
Generate fstab:
genfstab -U /mnt >> /mnt/etc/fstab
Chroot to finish the installation#
Enter the new system:
arch-chroot /mnt
Base tools#
Install common tools:
pacman -S nano bash-completion man-db tealdeer ntfs-3g networkmanager nm-connection-editor networkmanager-openvpn
Enable NetworkManager:
systemctl enable NetworkManager.service
Locale, Timezone and hostname#
Open locale.gen with nano:
nano /etc/locale.gen
In this file, look for #en_US-UTF.8 UTF-8 and uncomment it (remove the # from the start of it).
After saving the file (CTRL + S then CTRL + X), we run the following:
locale-gen
Echoing LANG to locale.conf:
echo LANG=en_US.UTF-8 > /etc/locale.conf
Europe/Amsterdam with your timezone. List options with ls /usr/share/zoneinfo or ls /usr/share/zoneinfo/EuropeSyslink your timezone with /etc/localtime. For me, this is Europe/Amsterdam:
ln -sf /usr/share/zoneinfo/Europe/Amsterdam > /etc/localtime
Sync to hardware clock:
hwclock --systohc
Configure NTP (clock sync etc):
nano /etc/systemd/timesyncd.conf
Make changes to this file like the below:
[Time]
NTP=0.arch.pool.ntp.org 1.arch.pool.ntp.org 2.arch.pool.ntp.org 3.arch.pool.ntp.org
FallbackNTP=0.pool.ntp.org 1.pool.ntp.org
Enable timesyncd:
systemctl enable systemd-timesyncd.service
Hostname (example: tomoko. Can be anything, keep it to lowercase + 1 word):
echo tomoko > /etc/hostname
Enable SSD/NVMe TRIM (for SSD/NVMe only):
systemctl enable fstrim.timer
Configure pacman#
Lets configure pacman to use 32-bit, Edit pacman.conf:
nano /etc/pacman.conf
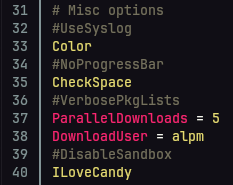
- Optionally enable
Colorby uncommenting it - Optionally add
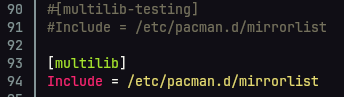
ILoveCandyunderParallelDownloads - At the bottom, uncomment
[multilib]and itsIncludeline
Then update package database:
pacman -Sy
Create user, set passwords#
Set root (admin) password:
passwd
Create a normal user (example: pura):
useradd -m -G wheel,storage,power -s /bin/bash pura
Change password for user (in this case pura):
passwd pura
Configure sudo, giving pura admin abilities:
EDITOR=nano visudo
- Uncomment the
%wheel ALL=(ALL:ALL) ALLline - Add at bottom:
Defaults rootpw

Bootloader#
Install systemd-boot:
bootctl install
Create loader entry:
nano /boot/loader/entries/arch.conf
In that file, put the following content:
title Arch Linux
linux /vmlinuz-linux
initrd /initramfs-linux.img
Run the following command after:
echo "options root=PARTUUID=$(blkid -s PARTUUID -o value /dev/sdx3) rw" >> /boot/loader/entries/arch.conf
Verify with:
cat /boot/loader/entries/arch.conf
Initramfs for NVIDIA (optional)#
NVIDIA GPU. Skip to finished! otherwise.Edit mkinitcpio.conf:
nano /etc/mkinitcpio.conf
Set modules to the following (has to be in that order):
MODULES=(nvidia nvidia_modeset nvidia_uvm nvidia_drm)
Update boot entry to enable modeset:
nano /boot/loader/entries/arch.conf
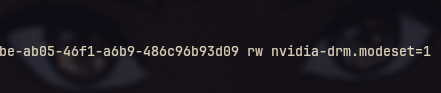
On this file, add the the end of rw the following:
... rw nvidia-drm.modeset=1
Create a pacman hook to rebuild initramfs on NVIDIA changes:
mkdir -p /etc/pacman.d/hooks
open nvidia.hook file:
nano /etc/pacman.d/hooks/nvidia.hook
Inside this nvidia.hook file, we write the following content:
[Trigger]
Operation=Install
Operation=Upgrade
Operation=Remove
Type=Package
Target=nvidia

[Action]
Depends=mkinitcpio
When=PostTransaction
Exec=/usr/bin/mkinitcpio -P
Lets run the following to finish up:
mkinitcpio -P
Running the above command might show errors about nvidia, you can safely ignore those, as we have not installed nvidia drivers yet. In KDE Plasma 6 section, we will install those.
Finished!#
Exit:
exit
Unmount (command is umount not unmount btw!!!):
umount -R /mnt
Reboot:
reboot
After reboot you will land in a TTY login without a GUI. This is a minimal Arch install. In the next section you can install a desktop environment (for example, KDE Plasma 6.