Return to the Arch Index.
sbctl installation#
Secure Boot Setup Mode#
Every motherboard BIOS is different, so you’ll need to check your own settings to disable Secure Boot and enter Setup Mode. For example, on my B650 AORUS ELITE AX V2, go to Advanced Mode → Boot → Secure Boot, then disable it and select Reset to Setup Mode.
If unsure, google search for “[your motherboard name] disable secure boot”.
Installing sbctl#
Once Secure Boot is disabled and in Setup Mode, install sbctl:
sudo pacman -Sy sbctl
Check its status:
sudo sbctl status
You should see Setup Mode: Enabled and Secure Boot: Disabled. Exactly what we want.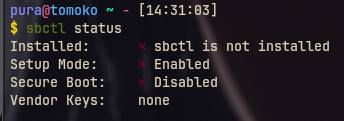
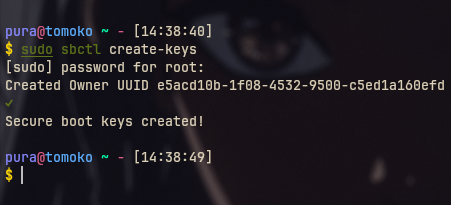
Create the keys:
sudo sbctl create-keys
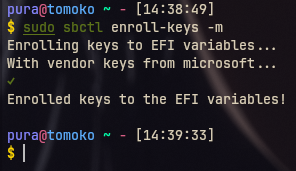
Enroll them:
sudo sbctl enroll-keys -m
Sign the systemd EFI:
sudo sbctl sign -s -o /usr/lib/systemd/boot/efi/systemd-bootx64.efi.signed /usr/lib/systemd/boot/efi/systemd-bootx64.efi

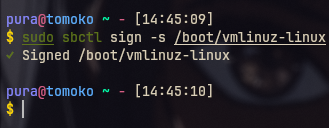
Then sign the kernel:
sudo sbctl sign -s /boot/vmlinuz-linux
Reinstalling bootloader#
Reinstall the bootloader:
sudo bootctl install
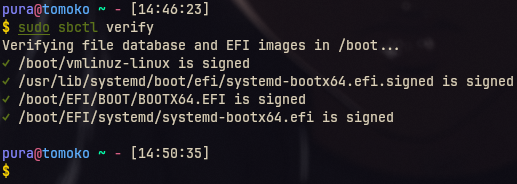
Verify everything:
sudo sbctl verify
Done! Reboot your system:
reboot
Reinstall the Linux kernel:
sudo pacman -S linux
When it finishes, you should see signing messages. Meaning key signing now works automatically.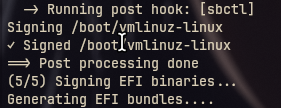
After confirming everything, re-enable Secure Boot in your BIOS (run sbctl status to confirm):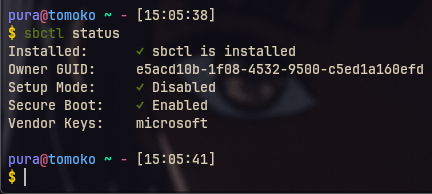
You’re now good to go! Or ready to dual boot if you dare. (Windows. ew.)
You can find the dual booting guide here.